Stanley has been outfitting workshops since 1843, and there’s a reason their yellow-and-black tools still dominate job sites and home garages. They’re built for work, not display. Whether someone’s framing a wall, installing trim, or fixing a fence, Stanley hand tools deliver predictable performance without the premium price tag of boutique brands. This guide walks through the essentials every DIYer should own, how to choose tools that match specific projects, and proven maintenance practices that keep these tools working for decades.
Table of Contents
ToggleKey Takeaways
- Stanley hand tools dominate workshops for over 180 years because they combine professional-grade durability with affordable pricing, making them ideal for both DIYers and contractors.
- A foundation DIY toolkit should include a FatMax tape measure, 16-ounce claw hammer, utility knife, combination square, and toolbox saw to handle 80% of residential projects.
- Stanley hand tools maintain backward compatibility and standardized parts across product lines, so replacement blades and components are universally available at home centers and online retailers.
- Proper maintenance—including daily cleaning, regular blade sharpening, annual level calibration, and slow tape retraction—extends tool life from years to decades without premature replacement.
- Match tool selection to your project type: prioritize precision instruments for trim work, heavy-duty tools for framing, and core basics for general home repair rather than buying complete bundled sets.
Why Stanley Hand Tools Remain a Workshop Staple
Stanley’s longevity isn’t about marketing, it’s about manufacturing reliability at scale. The company pioneered the modern tape measure, the retractable utility knife, and the adjustable wrench design most competitors still copy. Their tools hit a sweet spot: tough enough for professional framers but affordable enough for weekend warriors.
Most Stanley hand tools use forged steel or chrome vanadium alloy for cutting edges and striking surfaces, which resist chipping and hold an edge longer than cheap hardware store alternatives. The FatMax line, for example, uses reinforced frames and thicker blade stocks than standard models. That matters when someone’s beating a chisel through hardwood or prying apart framing lumber.
Another advantage: availability. Stanley tools are stocked at nearly every home center, hardware store, and online retailer in North America. If a tape measure breaks mid-project on a Saturday afternoon, replacement is fifteen minutes away, not a three-day shipping delay. Parts like replacement blades, measurement tapes, and blade locks are standardized across product lines, which cuts down on compatibility headaches.
Stanley also maintains backward compatibility. A PowerLock tape measure from 2010 uses the same replacement blade as the 2026 model. That’s rare in an industry where planned obsolescence drives profits. For homeowners building a tool collection over time, this consistency means investments compound rather than expire.
Must-Have Stanley Hand Tools for Every DIY Homeowner
Building a functional workshop doesn’t require buying everything at once. Start with these core Stanley tools that handle 80% of residential projects.
Measuring and Marking Tools
Precision starts before the first cut. Invest in these Stanley measuring essentials:
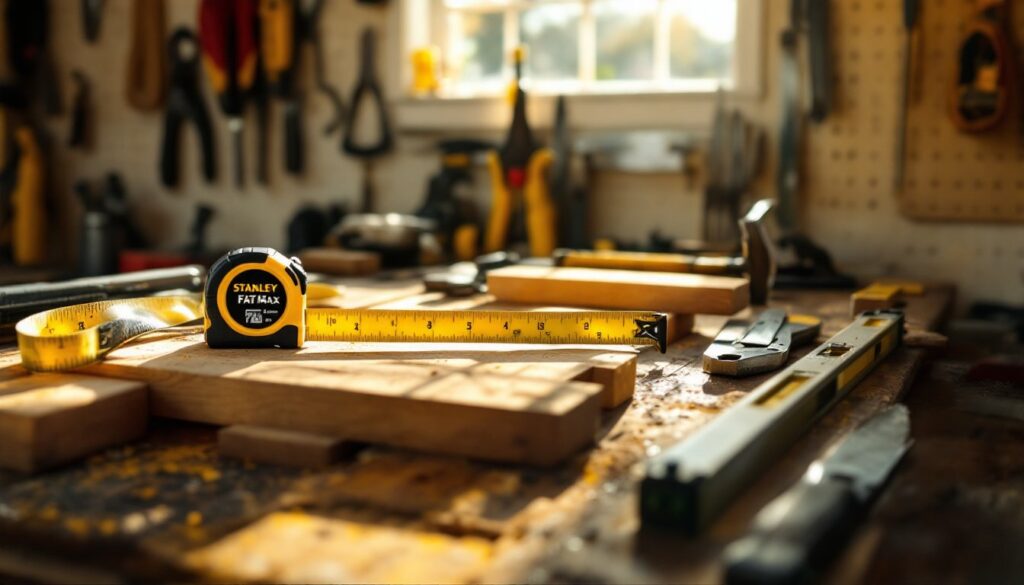
FatMax 25-foot tape measure: The 25-foot length covers most room dimensions and stud layouts. The FatMax blade standout reaches 11 feet before collapsing, which means measuring alone without the tape folding back. The 1-1/4-inch blade width with Mylar coating resists wear better than basic painted blades. Expect to pay $20-$30 depending on regional pricing.
4-foot level: A 48-inch box level is the minimum length for accurately setting door frames, checking wall studs, and leveling cabinets. Shorter levels magnify error over distance. Stanley’s box levels use machined aluminum frames with replaceable vials. Check that vials read accurately by flipping the level 180 degrees on a flat surface, both readings should match.
Combination square: This adjustable 12-inch square checks right angles, marks 45-degree miters, and measures depth in one tool. The hardened steel ruler slides through a cast-iron head that locks with a thumbscrew. Use it to set table saw blade angles and check miter saw accuracy.
Utility knife: Stanley invented the retractable blade design in 1936, and the 10-099 knife with quick-change blade mechanism remains the standard. Keep a dozen heavy-duty blades on hand, fresh blades make cleaner cuts in drywall, vinyl siding, and laminate.
Cutting and Shaping Tools
These Stanley hand tools handle cutting tasks that don’t justify setting up power equipment:
15-inch toolbox saw: This 15-point crosscut saw cuts finish lumber, plywood, and trim without dragging out a circular saw. The 9-inch cutting depth handles dimensional lumber up to 2×8. The hardened teeth stay sharp through hundreds of cuts. Many DIYers exploring comprehensive tool lists overlook hand saws, but they’re faster for quick cutoffs and won’t wake the neighbors.
16-ounce claw hammer: The curved claw design pulls nails better than straight claws. Look for a fiberglass handle with rubber grip, it dampens vibration better than wood or steel handles. Weight matters: 16 ounces drives finish nails and framing nails without excessive fatigue. Heavier hammers tire out homeowners: lighter hammers require more swings.
Five-piece chisel set: Stanley’s 750 series includes 1/4-inch, 1/2-inch, 3/4-inch, 1-inch, and 1-1/4-inch chisels with high-carbon steel blades and impact-resistant handles. These cut hinge mortises, clean up dado joints, and shave door edges. Always use a chisel with the bevel facing the waste side of the cut. Wear safety glasses, chisels can throw chips at eye level.
Block plane: A 6-inch block plane fits in one hand and shaves down sticky doors, rounds sharp lumber edges, and flattens proud joints. Stanley’s 12-220 uses a 20-degree blade angle that works on both hardwood and softwood. The adjustable throat opening controls shaving thickness. Keep the blade razor-sharp, a dull plane tears wood instead of slicing it.
Hacksaw: The 12-inch hacksaw with 24-teeth-per-inch blade cuts metal pipe, threaded rod, and brackets. Install blades with teeth pointing forward (away from the handle). Apply cutting pressure only on the forward stroke to extend blade life.
How to Choose the Right Stanley Tools for Your Projects
Match tool selection to project type, not just budget. Here’s how to prioritize purchases:
For trim carpentry and finish work: Invest in precision measuring tools first. A FatMax tape measure, combination square, and 12-inch speed square provide the accuracy finish work demands. Add a 6-inch block plane and finish chisel set. Projects from platforms like Instructables often require precise joinery where hand tools outperform power tools for control.
For framing and structural projects: Buy tools that withstand abuse. Choose the FatMax Xtreme tape measure with blade armor coating, a 22-ounce framing hammer instead of the 16-ounce finish hammer, and a heavy-duty utility knife. Add a 48-inch box level for wall studs and wrecking bar for demolition. Note: Any work affecting load-bearing walls requires permits and often a licensed contractor under IRC guidelines. Verify local requirements before starting.
For general home repair: Start with a core set: 25-foot tape measure, 16-ounce hammer, utility knife, combination square, and toolbox saw. This covers hanging pictures, assembling furniture, patching drywall, and cutting trim. Add specialty tools as specific projects demand them.
For workshop setup: If building out a dedicated space for mechanical tools and equipment, include bench vises, clamps, and marking gauges alongside cutting and measuring tools. Stanley’s MaxSteel clamps apply 300 pounds of clamping pressure and convert between bar clamp and spreader configurations.
Quality indicators to check before purchase:
- Blade markings: Quality saws and chisels stamp the steel type (high-carbon, chrome vanadium) directly on the tool.
- Handle attachment: Hammer handles should be wedged and glued, not just friction-fit.
- Level vial clarity: Bubbles should move smoothly without sticking. Cloudy liquid indicates seal failure.
- Tape measure blade: Check for clear, etched markings. Printed scales fade with use.
Avoid buying complete tool sets unless every included item serves an immediate purpose. Those 65-piece bundles often include duplicate sizes and specialty tools that never leave the case. Build a collection based on actual project needs, not perceived value.
Caring for Your Stanley Hand Tools to Maximize Longevity
Proper maintenance extends tool life from years to decades. These practices prevent rust, maintain accuracy, and keep cutting edges sharp.
Daily cleaning: Wipe down tools after each use. Sawdust absorbs moisture and accelerates rust on bare steel. Use a dry cloth for general debris and mineral spirits on a rag for pitch or adhesive buildup. Never leave tools in wet grass, concrete floors, or truck beds overnight, condensation causes surface rust.
Rust prevention: Apply a thin coat of paste wax (the same type used on table saws) to bare metal surfaces every few months. Johnson’s Paste Wax works well and won’t interfere with wood finishes. For storage exceeding a month, spray tools with moisture-displacing lubricant and wrap them in tool rolls or cases. Desiccant packs in toolboxes prevent humidity damage.
Blade sharpening: Chisels and plane blades need honing every 3-5 hours of use. Use combination waterstones (1000/6000 grit) or oil stones (medium/fine). Hold the blade at the existing bevel angle, usually 25-30 degrees for chisels. Work through grits until a burr forms on the back, then flip and flatten the back side. A sharp edge reflects no light under bright illumination.
Saw maintenance: Hand saws can’t be easily sharpened at home, the tooth geometry requires specialized files and experience. When a Stanley saw dulls (indicated by excessive force required for cuts and burning smell), replacement is more cost-effective than sharpening services. Expect 200-300 linear feet of cutting before noticeable dulling on softwood, less on hardwood and treated lumber.
Level calibration: Check level accuracy annually. Place the level on a flat surface, note the bubble position, rotate 180 degrees, and check again. If readings differ by more than 1/16 inch over 4 feet, the vial needs replacement. Stanley sells replacement vial kits for most models.
Tape measure care: Retract tapes slowly, letting them snap back damages the return spring and bends the hook. If the tape won’t lock, disassemble the case and clean sawdust from the blade lock mechanism with compressed air. The end hook is intentionally loose by the thickness of the hook itself, this compensates for inside vs. outside measurements. Don’t “fix” the loose rivet.
Handle replacement: Wooden handles on hammers and chisels eventually crack. Stanley sells replacement handles for most models. Drive out the old handle by drilling out wedges, clean the tool head socket, fit the new handle, and install wedges perpendicular to the grain. Apply wood glue to wedges before driving them flush.
Storage organization: Store tools in well-organized workshop spaces where they’re protected from moisture and easy to find. Pegboards work for frequently used items: drawer toolboxes protect precision instruments like squares and gauges. Never pile tools, edges get dinged and calibration suffers. Workshops featured on sites like Fix This Build That often use French cleat systems for efficient hand tool storage.
Conclusion
Stanley hand tools form the foundation of a functional workshop because they’re designed for the reality of home improvement work: unpredictable projects, budget constraints, and the need for tools that simply work. Start with measuring and cutting essentials, add specialty tools as projects demand them, and maintain everything properly. A well-chosen Stanley toolkit handles decades of repairs, renovations, and builds without the drama of failed fasteners or inaccurate measurements.